Back To School DIY Supplies
5:33 AM
Hi guys! Going back to school sucks a lot, however think about those hot boys at your school and be excited for it because you are going to rock this year!
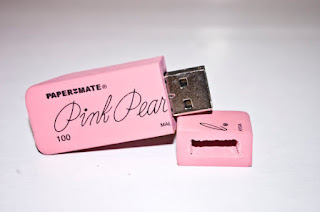
1) Eraser
Flash Drive:
Only
ingredients that you will need are;
· Cutter
· Eraser
· Flashdrive
First
you have to seperate the outher protector and the main flashdrive,then measure
up how long eraser need to be cut and cut the top off after that measure how
big the hole needs to be and take the inner parts of the eraser out, that’ s it
you have a eraser flash drive that you can use in both art and computer class.
2) Washi
Tape Pencils:
You will need;
· Washi tape
· Pencils
Dress up those plain yellow pencils with patterned washi tape and make your own designs.
3)Tumblr
Notebooks:
Ingredients that you will need are;
· Two packets of note paper
·
Binder clips
·
Brush
·
Glue
·
Some photos
To start making notebook you
have to make sure that all size of your note paper is straight, then take up
your binder clips and clip it to the note paper it prevents paper to move,then
add glue to the part that you are going to bind together ,take the thicker
paper and add some glue on it , place your photos on to top of the thicker
paper and let it dry for thirty minutes.When
it’s completly dry take another
thick paper, this is going to be the back of the notebook cut a thick black
straight line and add some glue,place it to the corner of the notebook and
thats its now you have a super tumblr notebook which is going to rock it.
4)Tumblr Cup:
Only ingredients that you will need is;
·
Any type of cup that you like
·
Sharpies
·
Piece of chalk board contact paper
·
Sprey sealer
This is all up to you and being creative is
the fun part, you can draw anything that you want.When you finish drawing sprey
sealer on it to make sure that nothing come off. Then take piece of chalk board
paper and stick it to the place that you want, so that way you can write anything that you want.
5)Outfit garland:
Only
ingredients that you will need are;
· 6 or 8 chalk board clothes pins
· Pictures of you favourite outfits
· String
· Chalk
First string up the rope and put the clothes pins on to the string then write the days of the
week on each of the mini chalk board and take the pictures of all your favorite
outfits then just hang the photos that it it will help you a lot to decide what to wear.
Hope these DIYs help you to get motivated for school, love you and see you next week, byee!
-Gülbeyaz


0 comments